[Winform] 블루투스 저전력(BLE) 통신 예제
카테고리: Winform
태그: BluetoothLE C# Winform
서버 코드(Linux 계열의 python 코드)가 궁금하신 분들은 다음 링크를 참고하시기 바랍니다.
👉👉👉블루투스 저전력 서버 구현 - 마시남의 기술블로그
Window UWP 와 프로젝트 설정
Winform 에서 블루투스 저전력을 구현하기 위해서는 우선, 윈도우 UWP 기능을 이용해야 합니다. UWP란, Window 10, Window 11 에서 실행되는 앱을 만들기 위한 라이브러리 입니다. 이것을 사용하기 위해서는 현재의 프로젝트를 선택하여 설정을 바꿔줘야 합니다.
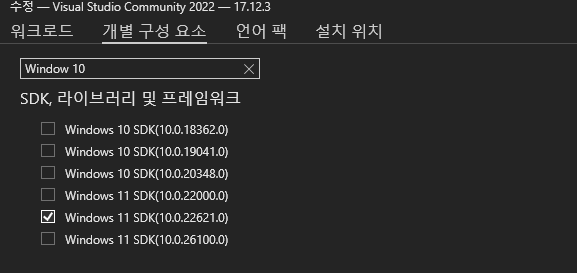
UWP 자체가 Window10, 11 을 타겟으로 하기 때문에, 프로젝트의 최소 Window 버전을 10으로 설정해줘야 합니다. 그리고 Visual Studio Installer 에 가서 Window 10 이상의 SDK가 설치되어 있는지 확인해야 합니다.
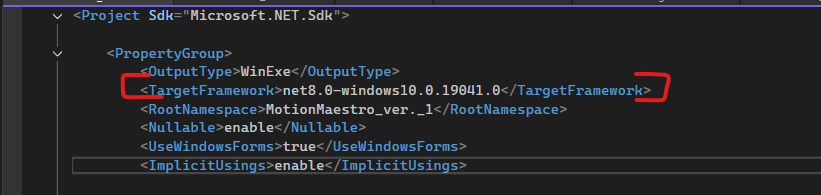
그리고, 현재 C# 프로젝트의 속성으로 가서, TargetFrameWork 부분에 Window 10 이상의 버전이 들어가 있는지 확인해야 합니다.
이렇게 추가하게 되면, 다음과 같은 네임스페이스를 사용할 수 있게 됩니다.
using Windows.Devices.Bluetooth;
using Windows.Devices.Bluetooth.GenericAttributeProfile;
using Windows.Devices.Enumeration;
using Windows.Storage.Streams;

이렇게 하면, 준비가 끝났습니다.
저전력 통신 코드 구현
저전력 통신 코드는 다음 마이크로 소프트 문서를 확인하여 구현할 수 있습니다.
Bluetooth DeviceWatcher
저전력 기기를 찾는 방식은 DeviceWatcher를 사용합니다. 그리고, 디바이스를 지정하는 쿼리 문자열을 전달하여 기기들을 찾습니다.
string[] requestedProperties = { "System.Devices.Aep.DeviceAddress", "System.Devices.Aep.IsConnected" };

DeviceWatcher deviceWatcher =
            DeviceInformation.CreateWatcher(
                    BluetoothLEDevice.GetDeviceSelectorFromPairingState(false),
                    requestedProperties,
                    DeviceInformationKind.AssociationEndpoint);

deviceWatcher.Added += DeviceWatcher_Added;
deviceWatcher.Updated += DeviceWatcher_Updated;
deviceWatcher.Removed += DeviceWatcher_Removed;
deviceWatcher.EnumerationCompleted += DeviceWatcher_EnumerationCompleted;
deviceWatcher.Stopped += DeviceWatcher_Stopped;

deviceWatcher.Start();
여기서 쿼리 문자열을 살펴보면 다음과 같습니다.
string[] requestedProperties = { "System.Devices.Aep.DeviceAddress", "System.Devices.Aep.IsConnected" };
- System.Devices.Aep.DeviceAddress : 기기의 고유 주소(MAC Address)
- System.Devices.Aep.IsConnected : 해당 기기가 현재 연결 상태인지의 여부
해당 정보들을 가져올 수 있게 됩니다.
그리고, 아래 코드는 DeviceWatcher를 설정하는 부분 입니다.
DeviceWatcher deviceWatcher =
            DeviceInformation.CreateWatcher(
                    BluetoothLEDevice.GetDeviceSelectorFromPairingState(false),
                    requestedProperties,
                    DeviceInformationKind.AssociationEndpoint);
여기서 주목해야할 점은, BluetoothLEDevice.GetDeviceSelectorFromPairingState(bool) 입니다. 여기서, bool 은 페어링 되었있는가의 여부 입니다. true로 설정하면, 이미 페어링 된 장치만 가져오게 되고, false로 설정하면 페어링 되지 않은 기기를 가져오게 됩니다.
다음은, 각 시점의 이벤트 입니다.
deviceWatcher.Added += DeviceWatcher_Added;
deviceWatcher.Updated += DeviceWatcher_Updated;
deviceWatcher.Removed += DeviceWatcher_Removed;
deviceWatcher.EnumerationCompleted += DeviceWatcher_EnumerationCompleted;
deviceWatcher.Stopped += DeviceWatcher_Stopped;
- Added : 새롭게 발견된 기기가 있으면 호출됨
- Updated : 이미 검색된 기기의 속성 정보가 갱신될 때 호출됨
- Removed : 더 이상 유효하지 않은 기기가 사라질 때 호출됨
- EnumerationCompleted : 시스템이 인식 가능한 모든기기를 한번씩 열거했을때 호출됨
- Stopped : DeviceWatcher가 중단되거나, 오류가 발생했을 때 호출됨
위의 이벤트들을 사용하여 로직을 제어할 수 있습니다.
Device에 연결하기
DeviceWatcher를 통해 찾은 기기들을 연결하는 방법 입니다. Device가 Add 될 때, 콜백으로 넘어오는 DeviceInformation을 사용 합니다.
async void ConnectDevice(DeviceInformation deviceInfo)
{
    BluetoothLEDevice bluetoothLeDevice = await BluetoothLEDevice.FromIdAsync(deviceInfo.Id);
}
해당 코드로 기기의 값이 넘어오게 되면, 그 후에, 해당 기기가 광고(advertise)하고 있는 서비스와 특성을 찾아야 합니다.
우선, 서비스를 찾는 방법입니다.
var servicesResult = await bluetoothLeDevice.GetGattServicesAsync();
 if (servicesResult.Status == GattCommunicationStatus.Success)
 {
	 //GATT 서비스를 가져왔을때
 }
위 코드로 서비스를 가져와서, GATT 서비스를 가져왔는지 확인하게 됩니다. 여기서 주의해야 할 점은, 기기가 Discoverable 인 상태가 아니면 GattCommunicationStatus.Unreachable을 반환하게 되며, 통신이 종료됩니다.
서비스를 찾았다면, 다음은 서비스 안의 특성을 찾아야 합니다. 특성을 찾는 코드는 다음과 같습니다.
GattCharacteristicsResult result = await service.GetCharacteristicsAsync();

if (result.Status == GattCommunicationStatus.Success)
{
    var characteristics = result.Characteristics;
}
특성을 찾은 후, 서버가 광고하고 있는 특성의 종류를 판별해야 합니다. 특성의 종류에는 Read, Write, Notify 이렇게 3종류가 있습니다.
GattCharacteristicProperties properties = characteristic.CharacteristicProperties

if(properties.HasFlag(GattCharacteristicProperties.Read))
{
    //읽기만 가능
}
if(properties.HasFlag(GattCharacteristicProperties.Write))
{
    //쓰기만 가능
}
if(properties.HasFlag(GattCharacteristicProperties.Notify))
{
    //알림 구독만 가능
}
읽기와 쓰기를 할때, 데이터를 다루는 방법은 다음과 같습니다.
- 읽기 & 알림 구독시
GattReadResult result = await selectedCharacteristic.ReadValueAsync(); if (result.Status == GattCommunicationStatus.Success) { var reader = DataReader.FromBuffer(result.Value); byte[] input = new byte[reader.UnconsumedBufferLength]; reader.ReadBytes(input); } - 쓰기 ```cs var writer = new DataWriter(); writer.WriteByte(0x01);
GattCommunicationStatus result = await selectedCharacteristic.WriteValueAsync(writer.DetachBuffer()); if (result == GattCommunicationStatus.Success) { //성공적으로 쓴 경우 }
그리고, 저전력 기기의 경우 1대1 통신보다는 브로드캐스트 방식을 많이 사용하기 때문에, `알림 구독`을 많이 사용하게 됩니다.

알림을 가져오기 전에는 다음을 수행해야 합니다.

- CCCD(클라이언트 구성 설명자)에 쓰기
- Characteristic.ValueChanged 이벤트 처리하기

CCCD는 알림 구독을 할 수 있는지 판별하는 녀석이고, Characteristic.ValueChanged 이벤트는 값을 받았을 때, 처리할 행동을 정의하는 부분입니다.

```cs
GattCommunicationStatus status = await selectedCharacteristic.WriteClientCharacteristicConfigurationDescriptorAsync(
                        GattClientCharacteristicConfigurationDescriptorValue.Notify);
if(status == GattCommunicationStatus.Success)
{
    characteristic.ValueChanged += Characteristic_ValueChanged;
}
처음에 이부분에서 많이 갈려나갔습니다. 아무리 해도 알림 구독이 되지 않았기 때문입니다. 그때 의심해본것이 제 블루투스 동글이였는데, 블루투스 동글이의 버전이 4.0 이었고, 저전력을 지원하지 않는 모델이었습니다. 동글이가 저전력을 지원하는지 여부를 확인하는것도 중요하다는것을 알게 되었습니다.
동작코드
아래는 제가 문서와 다른 글들을 보면서 생각나는대로 작성한 코드 입니다.
using Windows.Devices.Bluetooth;
using Windows.Devices.Bluetooth.GenericAttributeProfile;
using Windows.Devices.Enumeration;
using Windows.Storage.Streams;


namespace MotionMaestro_ver._1.Forms
{
    public partial class Form1 : Form
    {
        private DeviceWatcher deviceWatcher;
        private DeviceInformation selectedDevice;
        private BluetoothLEDevice bluetoothLeDevice;
        private GattCharacteristic notifyCharacteristic;

        public Form1()
        {
            InitializeComponent();
        }

        private void StartDeviceWatcher(object sender, EventArgs e)
        {
            string[] requestedProperties = { "System.Devices.Aep.DeviceAddress", "System.Devices.Aep.IsConnected" };

            deviceWatcher = DeviceInformation.CreateWatcher(
                BluetoothLEDevice.GetDeviceSelectorFromPairingState(false),//페어링 되어 있는가 없는가 판단
                requestedProperties,
                DeviceInformationKind.AssociationEndpoint);

            deviceWatcher.Added += DeviceWatcher_Added;
            deviceWatcher.Updated += DeviceWatcher_Updated;
            deviceWatcher.Removed += DeviceWatcher_Removed;
            deviceWatcher.EnumerationCompleted += DeviceWatcher_EnumerationCompleted;
            deviceWatcher.Stopped += DeviceWatcher_Stopped;

            deviceWatcher.Start();
        }

        private async void DeviceWatcher_Added(DeviceWatcher sender, DeviceInformation deviceInfo)
        {
            Invoke(new Action(() =>
            {
                textBox1.AppendText(deviceInfo.Name);
            }));

            if (deviceInfo.Name == "Heart Monitor")
            {
                selectedDevice = deviceInfo;
                deviceWatcher.Stop();

                bluetoothLeDevice = await BluetoothLEDevice.FromIdAsync(selectedDevice.Id);
                if (bluetoothLeDevice != null)
                {
                    this.Invoke(new Action(() =>
                    {
                        textBox1.AppendText("Device connected!\n");
                    }));

                    await DiscoverServices();
                }
                else
                {
                    textBox1.AppendText("Failed to connect to device.\n");
                }
            }
        }

        private async Task DiscoverServices()
        {
            // 블루투스 장치에서 GATT 서비스를 비동기적으로 가져옵니다.
            var servicesResult = await bluetoothLeDevice.GetGattServicesAsync();

            // GATT 서비스를 성공적으로 가져왔는지 확인합니다.
            if (servicesResult.Status == GattCommunicationStatus.Success)
            {
                foreach (var service in servicesResult.Services)
                {
                    string serviceUuid = service.Uuid.ToString();

                    if (serviceUuid.Equals("0000180D-0000-1000-8000-00805F9B34FB", StringComparison.OrdinalIgnoreCase))
                    {
                        var characteristicsResult = await service.GetCharacteristicsAsync();

                        foreach (var characteristic in characteristicsResult.Characteristics)
                        {
                            string characteristicUuid = characteristic.Uuid.ToString();

                            bool hasNotifyFlag = characteristic.CharacteristicProperties.HasFlag(GattCharacteristicProperties.Notify);
                            bool isTargetCharacteristic = characteristicUuid.Equals("00002A37-0000-1000-8000-00805F9B34FB", StringComparison.OrdinalIgnoreCase);

                            if (hasNotifyFlag && isTargetCharacteristic)
                            {
                                notifyCharacteristic = characteristic;

                                notifyCharacteristic.ValueChanged += NotifyCharacteristic_ValueChanged;

                                try
                                {
                                    await notifyCharacteristic.WriteClientCharacteristicConfigurationDescriptorAsync(
                                        GattClientCharacteristicConfigurationDescriptorValue.Notify);

                                    // 알림 활성화가 성공적으로 완료되었음을 사용자에게 알려줍니다.
                                    this.Invoke(new Action(() =>
                                    {
                                        textBox1.AppendText("notification Enabled\n");
                                    }));

                                    // 한 개의 Notify 특성만 사용하므로 반복문 종료
                                    break;
                                }
                                catch (Exception ex)
                                {
                                    this.Invoke(new Action(() =>
                                    {
                                        textBox1.AppendText("실패 : " + ex.Message + "\n");
                                    }));
                                }
                            }
                        }
                    }
                }
            }
            else
            {
                // GATT 서비스를 가져오지 못한 경우 사용자에게 에러 메시지를 표시
                MessageBox.Show("Failed to discover GATT services.");
            }
        }


        private void NotifyCharacteristic_ValueChanged(GattCharacteristic sender, GattValueChangedEventArgs args)
        {
            var reader = DataReader.FromBuffer(args.CharacteristicValue);
            byte[] input = new byte[args.CharacteristicValue.Length];
            reader.ReadBytes(input);
            string received = System.Text.Encoding.UTF8.GetString(input);

            Invoke(new Action(() =>
            {
                textBox1.AppendText($"Received: {received}\n");
            }));
        }

        private void DeviceWatcher_Updated(DeviceWatcher sender, DeviceInformationUpdate args)
        {
            // 필요에 따라 업데이트 처리
            this.Invoke(new Action(() =>
            {
                textBox1.AppendText("Updated\n");
            }));
        }

        private void DeviceWatcher_Removed(DeviceWatcher sender, DeviceInformationUpdate args)
        {
            WorkOnUiThread(() => textBox1.AppendText("Removed\n"));
        }

        private void DeviceWatcher_EnumerationCompleted(DeviceWatcher sender, object args)
        {
            this.Invoke(new Action(() =>
            {
                textBox1.AppendText("Device enumeration completed.\n");
            }));
        }

        private void DeviceWatcher_Stopped(DeviceWatcher sender, object args)
        {
            WorkOnUiThread(() => textBox1.AppendText("Stopped"));
        }

        private void WorkOnUiThread(Action _action)
        {
            this.Invoke(_action);
        }
    }
}
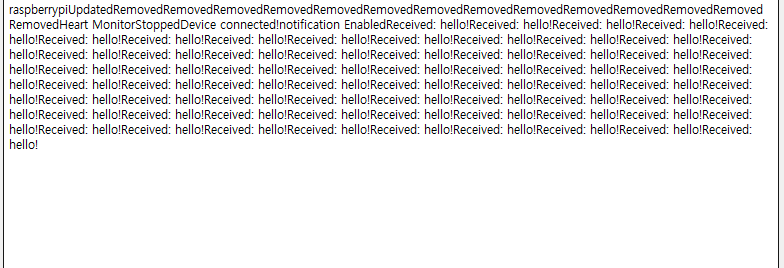
서버에서는 hello 라는 문자를 1초마다 Notify 하도록 했고, 동작결과는 다음과 같습니다.
동작은 하나, 위 코드를 보면 유지보수성과 가독성이라곤 찾아볼 수 없습니다. 아래의 포스팅에서 위 코드를 리팩터링하는 과정을 기술합니다.
댓글 남기기