[Design Pattern] 브릿지 패턴 (Bridge Pattern)
카테고리: Design Pattern
브릿지 패턴이란?
브릿지 패턴 이란, 구현부에서 추상층을 분리하여 각자 독립적으로 변형이 가능하고 확장이 가능하도록 합니다.
즉, 추상체끼리 브릿지 라는 통로를 통해 서로 통신을 하는 것을 의미합니다.
브릿지 패턴은, 각 추상층과 구현부를 분리하고, 추상층끼리 서로 소틍을 하게 하여, 구현부분을 확장하기 용이하게 만든 패턴입니다.
해당 패턴을 설명할 때, 예로 드는 것이 바로 TV와 Remote Controller 입니다.
TV와 리모컨은 서로의 존재에 대해서 모르지만, 인터페이스만 같다면, 채널을 바꾸거나, 볼륨을 올리거나, 티비를 끄거나 켤 수 있습니다.
이 패턴은, 윈도우에도 적용되어 있는데, 여러 플랫폼에서 사용해야 하는 그래픽스와 윈도우 처리 시스템에서 유용하게 쓰이고 있습니다.
다음은 클래스 다이어그램 입니다. 밑에 빨간색으로 표시한 부분을 소통창구 브릿지라고 부릅니다.
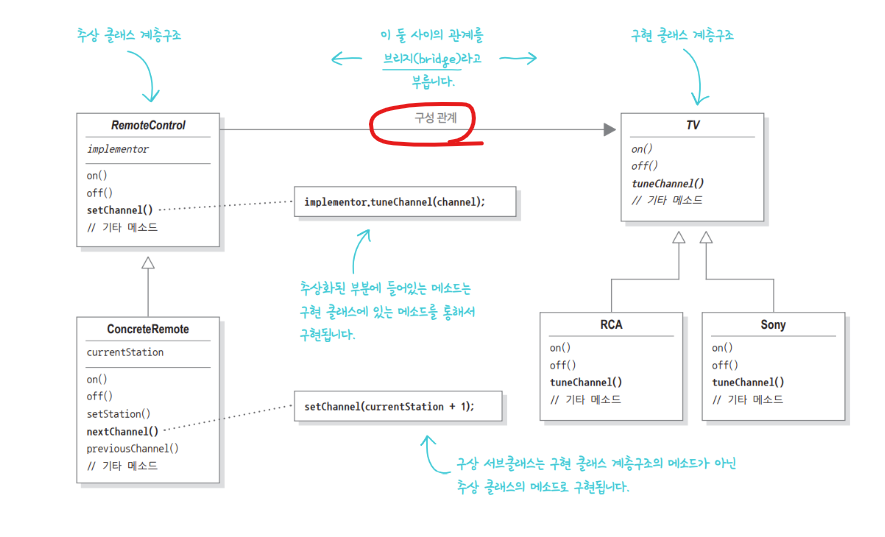
패턴의 장점
- 구현과 인터페이스를 완전히 결합하지 않았기에 구현과 추상화 부분을 분리할 수 있음
- 추상화된 부분과 실제 구현 부분을 독립적으로 확장할 수 있음
- 추상화 부분을 구현한 구상 클래스가 바뀌어도 클라이언트에는 영향을 끼치지 않음
패턴의 단점
- 디자인이 복잡해질 수 있음
- 팩토리를 사용할 때, 클라이언트에 대해 과하게 알아야 할 수 있음
예제
앞서 언급하였듯이, 리모컨과 TV 간의 통신을 브릿지 패턴으로 구현합니다.
TV 구현하기
우선, TV를 구현 합니다. TV는 LG 와 Sony 두종류가 있다고 가정 합니다. 우선, TV 들의 공통점을 추상 클래스로 묶습니다.
TV는 켜다, 끄다, 채널을 바꾸다, 현재 채널 정보를 가져온다 의 4가지 기능으로 구성되어 있습니다.
🗅 abstract class TV
package src.bridge.tv;

public abstract class TV {
    public abstract void on();
    public abstract void off();
    public abstract void tuneChannel(int _channel);
    public abstract int getChannel();
}
이제 이 추상클래스를 상속받아 실제 TV 구현 클래스를 만듭니다.
🗅 class LG
package src.bridge.tv;

public class LG extends TV{

    private int channel = 1;

    @Override
    public void on() {
        System.out.println("TV 키는 중");
    }

    @Override
    public void off() {
        System.out.println("TV 끄는 중");
    }

    @Override
    public void tuneChannel(int _channel) {
        this.channel = _channel;
        System.out.println("TV 채널을 "+_channel + " 로 변경합니다.");
    }

    @Override
    public int getChannel() {
        return channel;
    }
}
🗅 class Sony
package src.bridge.tv;

public class Sony extends TV {
    private int station = 1;

    @Override
    public void on() {
        System.out.println("Sony TV 켜는 중");
    }

    @Override
    public void off() {
        System.out.println("Sony TV 끄는 중");
    }

    @Override
    public void tuneChannel(int _channel) {
        this.station = _channel;
        System.out.println("TV 채널을 "+_channel + " 로 변경합니다.");
    }

    @Override
    public int getChannel() {
        return station;
    }
}
TV Factory 만들기
TV 객체를 반환할 Factory를 하나 만듭니다. 현재 구현한 Factory 는 단순히 switch case 문에 따라 객체를 반환하는 SimpleFactory를 사용하였습니다.
🗅 enum TVType
package src.bridge.tv;

public enum TVType {
    LG,
    Sony,
    Length
}
🗅 enum TVFactory
package src.bridge;

import src.bridge.tv.LG;
import src.bridge.tv.Sony;
import src.bridge.tv.TV;
import src.bridge.tv.TVType;

public class TVFactory {
    public TV getTV(TVType _type) throws Exception {
        switch (_type) {
            case LG:
                return new LG();
            case Sony:
                return new Sony();
            default:
                throw new Exception("Invalid TV Type");
        }

    }
}
리모컨 만들기
이제, TV 를 조작할 리모컨을 만듭니다. 리모컨은 TV 에 의존적이게 만들었습니다. 리모컨의 각 버튼에 추상클래스인 TV의 메소드를 호출합니다.
TV 는 추상클래스이기 때문에, 생성자로 호출이 안됩니다. 그래서 생성자에서 DI 를 통해 TV 구현클래스를 받도록 합니다.
해당 리모컨도 추상클래스로 만들어, 각 리모컨에 맞게 구현하도록 만듭니다.
🗅 abstract class GenericRemote
package src.bridge.remote;

import src.bridge.TVFactory;
import src.bridge.tv.TV;
import src.bridge.tv.TVType;

public abstract class RemoteControl {
    private TV tv = null;
    private TVFactory tvFactory = null;

    public RemoteControl(TVFactory _tvFactory) {
        this.tvFactory = _tvFactory;
    }

    public void on() {
        this.tv.on();
    }

    public void off() {
        this.tv.off();
    }

    public void setChannel(int _channel) {
        tv.tuneChannel(_channel);
    }

    public int getChannel() {
        return tv.getChannel();
    }

    public void setTV(TVType _type) {
        try {
            tv = tvFactory.getTV(_type);
        } catch (Exception _ex) {
            System.out.println(_ex);
        }
    }

}
이제 이 추상 클래스를 상속받아 다른 타입의 리모컨을 구현 합니다.
🗅 class GenericRemote
package src.bridge.remote;

import src.bridge.TVFactory;

public class GenericRemote extends RemoteControl {

    public GenericRemote(TVFactory _tvFactory) {
        super(_tvFactory);
    }

    public void nextChannel() {
        int channel = this.getChannel();
        this.setChannel(channel + 1);
    }

    public void prevChannel() {
        int channel = this.getChannel();
        this.setChannel(channel - 1);
    }
}
🗅 class SpecialRemote
package src.bridge.remote;

import src.bridge.TVFactory;

public class SpecialRemote extends RemoteControl{
    public SpecialRemote(TVFactory _tvFactory) {
        super(_tvFactory);
    }

    public void up() {
        int channel = this.getChannel();
        this.setChannel(channel+1);
    }
    public void down() {
        int channel = this.getChannel();
        this.setChannel(channel-1);
    }
}
Main 에서 실행
이제, 티비와 리모컨을 각각 구현하였으니, Main에서 실행해 봅니다.
Main 에서는 TV Factory를 DI 한 다음, 리모컨의 setTV 를 통해 객체를 생성 합니다.
그리고, 브릿지로 연결되어 tv를 알고 있는 리모컨에게 명령을 내립니다.
package src.bridge;

import src.bridge.remote.GenericRemote;
import src.bridge.remote.SpecialRemote;
import src.bridge.tv.TVType;

public class Main {
    public static void main(String[] args) {
        TVFactory tvFactory = new TVFactory();
        SpecialRemote remoteSony = new SpecialRemote(tvFactory);
        System.out.println("TV 랑 리모컨이랑 연결하세요");

        remoteSony.setTV(TVType.Sony);
        remoteSony.on();
        remoteSony.up();
        remoteSony.down();
        remoteSony.off();

        System.out.println("\n\n");

        GenericRemote remoteLG = new GenericRemote(tvFactory);
        System.out.println("TV랑 리모컨이랑 연결하세요");
        remoteLG.setTV(TVType.LG);
        remoteLG.on();
        remoteLG.nextChannel();
        remoteLG.prevChannel();
        remoteLG.off();
    }
}
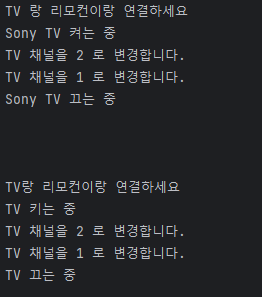
리모컨과 티비가 상호작용하여, 티비를 조작하는것을 볼 수 있습니다.
정리
헤드 퍼스트 디자인 패턴이라는 책을 보고 있는데, MVC 패턴이 마지막 패턴인줄 알았습니다. 책을 더 넘겨보니 기타 패턴들 이라고 해서 실전압축으로 패턴들이 들어가있더군요.
거기에서 제일 처음 만난 패턴이 바로 브릿지 패턴 입니다. 정보처리기사를 할 때, 글자로만 어떤거인지 외웠었는데, 실제로 구현해보니 어떤 패턴인지 이해가 더 잘 되는 것 같습니다.
해당 패턴을 쓰면, 리모컨과 TV 에 무한한 확장성이 생겨서 좋은 것 같습니다. 가령 Samsung TV나 apple RemoteControll 을 만들어서 통신을 시킬 수 도 있을 것 같습니다.
댓글 남기기